


Solar charging for lithium golf cart batteries
Jun.11, 2026
Stop worrying about battery drain. Keep your lithium golf cart charged with solar.
If you own a lithium golf cart — or run a rental fleet — you already know the pain.
Every day, you have to plug it in. And if the cart sits unused for too long, the BMS quietly drains the pack. Next thing you know, the battery is over-discharged. Dead. And in some cases, it won't even accept a charge anymore.
For rental companies, this is even more critical. You need your carts to have enough juice to make it back to the shop. You don't want to go looking for a cart that ran out of power halfway down the road.
That's why we built a solar charging system for lithium golf cart batteries.
It keeps the battery topped off. It prevents over-discharge. And it gives you peace of mind — whether you're storing the cart for a month or running a busy rental fleet.
Below is the exact system we installed, including a step‑by‑step tutorial.
What We Used
| Component | Specification |
|---|---|
| Lithium battery | Wiren 48V 105Ah LiFePO₄ (with built‑in BMS) |
| Solar charge controller | 30A MPPT (Maximum Power Point Tracking) |
| Solar panels | 4 x 120W flexible solar panels |
| Adhesive | Heavy‑duty panel glue / VHB tape |
| Cable management | Zip ties, cable clips |
| (Optional) | Dedicated lithium battery charger |
Note: The Wiren 48V 105Ah battery is a popular choice for Club Car, EZGO, and Yamaha 48V golf carts. It has built‑in low‑temperature cutoff and Bluetooth monitoring.
We installed the battery for LVTONG 4seats cart.
Installation video: https://www.youtube.com/watch?v=ILEIzup3M5U
Step 1: Install the Lithium Battery First
Before you touch the solar panels, get the battery installed properly.
Key precautions for lithium battery installation in a golf cart:
-
Switch the cart to TOW mode. This disconnects the controller and prevents electrical spikes.
-
Remove the old lead‑acid pack completely. Clean the battery tray with a wire brush. Apply rust‑preventive paint if needed.
-
Secure the new lithium battery. Use the supplied strap or drill pilot holes for self‑tapping screws. The battery must not shift during driving.
-
Always install a main fuse (Class T or ANL, rated 125–150A) on the positive terminal. Lithium batteries can deliver very high short‑circuit current — a fuse is mandatory.
-
If you have lights or USB ports, you will need a 48V‑to‑12V DC‑DC converter. Do not connect 12V accessories directly to the 48V battery.
-
Use a lithium‑compatible charger. Your old lead‑acid charger will damage the LiFePO₄ battery.
Once the Wiren 48V 105Ah battery is securely mounted and wired, move to the solar panels.
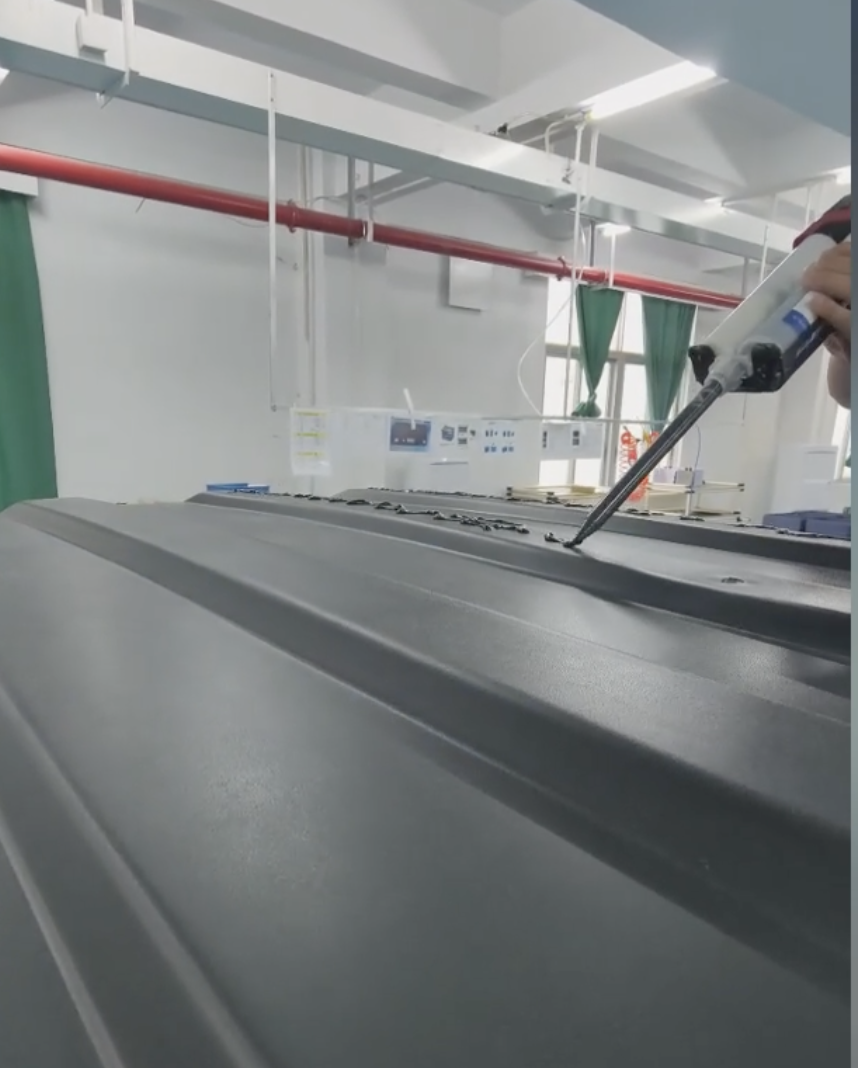
Step 2: Mount the Four Flexible Solar Panels
Flexible solar panels are lightweight and conform to slightly curved roofs. But they must be absolutely secure.
Installation tips:
-
Clean the roof surface thoroughly. Any dust or grease will weaken the adhesive.
-
Use the recommended adhesive. We used heavy‑duty panel glue (some installers prefer VHB tape plus additional edge sealing). Follow the adhesive manufacturer's curing time — do not drive the cart until fully cured.
-
Apply adhesive evenly across the back of each panel, not just the edges. Air gaps can lead to panel flapping at high speed.
-
Position the panels so they do not overhang the roof edge. Overhanging panels catch wind and are more likely to peel off.
-
Why so serious about mounting? If a panel flies off while driving, it could hit someone — a pedestrian, another cart, or the driver behind you. Secure mounting is a safety requirement, not just a suggestion.
After the adhesive cures, give each panel a firm pull test. If any panel lifts, reapply adhesive before proceeding.
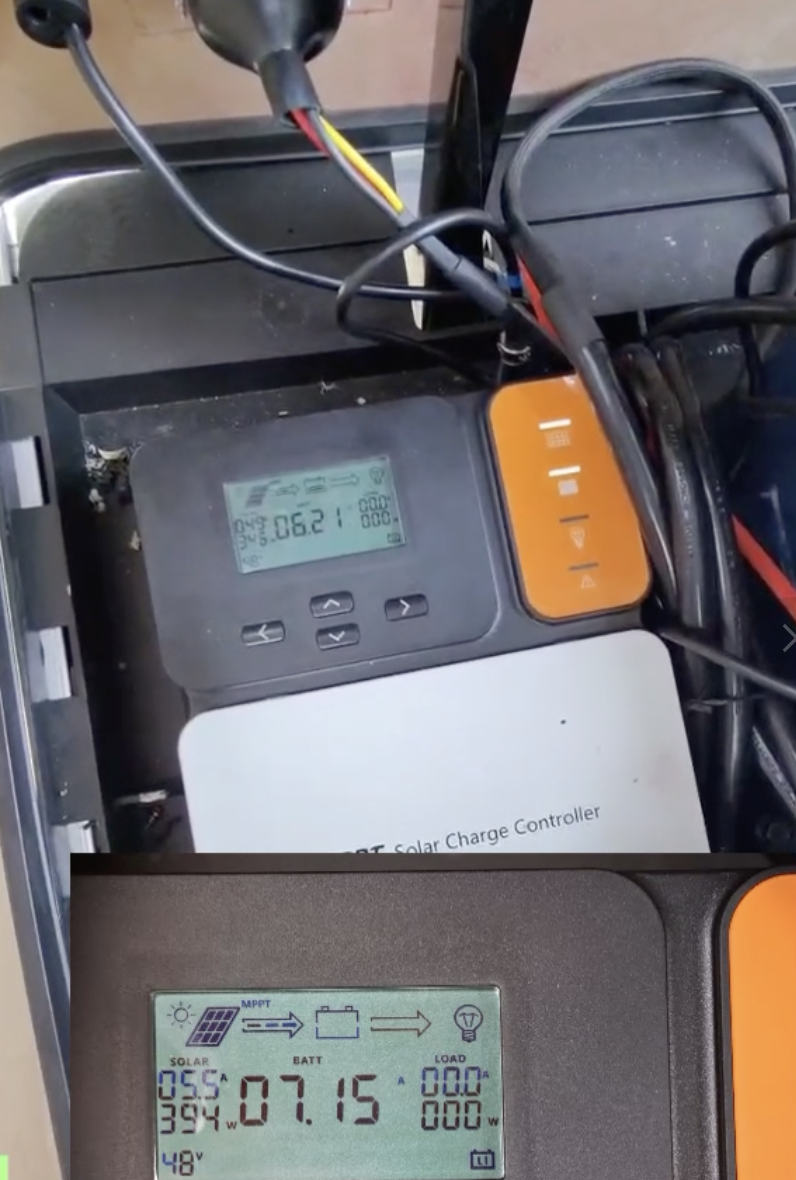
Step 3: Install the MPPT Solar Charge Controller
The MPPT (Maximum Power Point Tracking) controller converts the solar panel voltage to the correct charging voltage for your 48V lithium battery. A 30A MPPT is sufficient for 480W of solar (4 x 120W).
Where to mount the MPPT:
-
Choose a dry, ventilated location — under the seat or inside the battery compartment is common.
-
Keep the controller away from direct heat (e.g., not directly above the motor).
Wiring sequence (very important — do it in this order):
-
Connect the battery to the MPPT first. This powers up the controller and allows it to recognize the battery voltage.
-
Then connect the solar panels to the MPPT. If you connect the panels first, the controller may not set the correct charging profile.
Wire sizing and fusing:
-
Use at least 10 AWG wire between the MPPT and the battery.
-
Install a fuse or breaker on the wire from the MPPT to the battery (e.g., 30A–40A).
-
For the solar panel side, use solar‑rated MC4 connectors or weatherproof connections.
MPPT settings for LiFePO₄:
-
Charge profile: Lithium (LiFePO₄)
-
Absorption voltage: 58.4V (for a 48V pack)
-
Float voltage: 54.4V – 55.2V (or disable float if the controller allows)
-
Low‑temperature cut‑off: 0°C (32°F) — do not charge lithium below freezing.
Refer to your MPPT manual for exact menu navigation.
Step 4: Connect the Charger (Optional but Recommended)
Solar keeps the battery topped off, but for initial charging or cloudy weeks, you still want a dedicated lithium charger.
-
Use the lithium charger that came with your Wiren battery or a compatible 48V LiFePO₄ charger.
-
The charger should be CC/CV (constant current / constant voltage) with termination at 58.4V.
-
You can mount the charger onboard or keep it as a plug‑in unit.
We recommend keeping the charger accessible — for rental fleets, a fast charger allows quick turnaround even on cloudy days.
Final Check: How the System Works Together
Once everything is installed:
-
During sunlight, the MPPT charges the Wiren 48V 105Ah battery using solar power.
-
When the battery is full, the MPPT reduces current to a safe float level (or stops charging).
-
When the cart is parked for days or weeks, solar maintains the battery above the low‑voltage cutoff, preventing BMS shutdown.
-
For rental carts, solar helps ensure that even after a long day of use, the cart has enough charge to return to the depot.
Common Questions (FAQ)
Q: Do I still need to plug in the charger?
A: On sunny days, solar may be enough. But for cloudy weeks or heavy use, use the AC charger as a backup.
Q: Will solar overcharge my lithium battery?
A: No — a properly configured MPPT controller stops charging when the battery reaches the target voltage (58.4V).
Q: Can I install this on any golf cart?
A: This system works on any 48V lithium‑powered golf cart (Club Car, EZGO, Yamaha, ICON, etc.). The mounting method for panels depends on your roof type.
Q: Is this safe for rental fleets?
A: Yes, if installed correctly. Secure the panels well, fuse all connections, and use a BMS with low‑temperature protection. We recommend periodic inspection of mounting adhesive and cable ties.
The Bottom Line
Daily charging is a hassle. Over‑discharge kills lithium batteries. And for rental companies, unexpected dead carts ruin customer trust.
A solar charging system solves all three problems.
We installed the Wiren 48V 105Ah battery, a 30A MPPT, and four 120W flexible panels. The installation is straightforward if you follow the steps above — just remember: secure the panels well, fuse everything, and connect the battery to the MPPT first.
If you run a rental fleet or simply want a maintenance‑free golf cart, solar charging is worth every penny.
See installation video here: https://www.youtube.com/watch?v=ILEIzup3M5U
Learn more about battery: Learn more about battery, here!


